Computer users today are more concerned about privacy, work efficiency, and desktop customization. More and more people are realizing that Windows isn’t very private, efficient, or customizable. Add this to the fact that a genuine copy of Windows comes with a pretty hefty price tag, and in the end, you’ll be tired of running the same old operating system.
That is why more desktop users are looking for alternatives like Ubuntu.
Ubuntu is a free and open-source distribution or operating system based on Linux. Linux itself is a kernel base for many free and open-source operating systems. The majority of server computers worldwide use Linux, while the number of Linux desktop users is on a steady rise. Many new Linux users are flocking to Ubuntu as their distribution of choice.
Ubuntu has dominated the Linux desktop space for years. Because of this, the distribution is home to a large community of users and developers. Now on version 22.04, Ubuntu still brings a stable Linux experience, long-term support from its developers, and ease of use for beginners. It is as easy to use as it is to install, especially for those who want to make the switch from Windows to Ubuntu.
This guide will help you make the switch to free and open-source software an easier task.
- Pre-installation
To prepare for installing Ubuntu, you will need these devices:
- A USB drive with at least 8 GB of storage. This USB drive will serve as your installer device for the Ubuntu operating system. Make sure that your drive is empty beforehand! All data on the USB drive will be lost when you install the Ubuntu image on it.
- A laptop or desktop PC with the following minimum hardware specifications:
- 2 GHz processor
- 4 GB of RAM
- At least 25 GB of hard drive storage space
- Internet access is also recommended when installing Ubuntu. Besides your computer’s Wifi connection, you may need to prepare a wired Ethernet connection to your computer. You can also share your phone’s internet connection to your computer with a USB cable.
You will also need to backup the data on your Windows system. Installing Ubuntu on your hard drive will erase your entire Windows system, along with all the files in it! Making a backup beforehand will allow you to move your files to your Ubuntu system once it’s installed.
Backing up your personal files can be done manually. You can transfer the necessary files to a separate USB drive or external hard drive. You may also transfer your personal data to a separate hard drive within your computer.
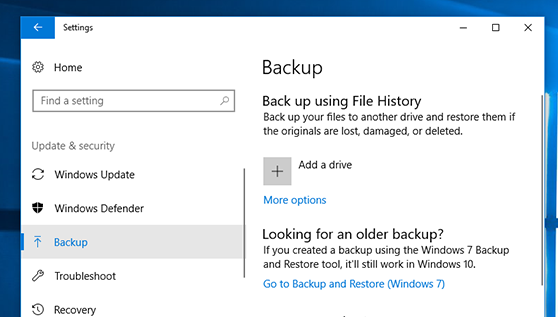
Windows 10 also has a file backup utility to make backing up your files simpler. All you need to do is:
- Open Settings on Windows 10.
- Search for “Backup” under Update and Security.
- Click “Add a drive“, then choose your external USB or hard drive for your backup.
2. Creating a bootable Ubuntu USB drive
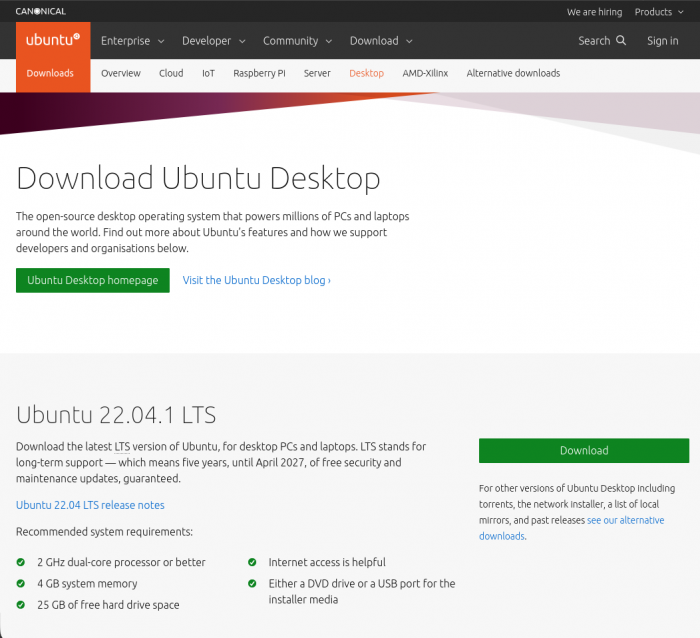
First, you will need to download an Ubuntu Desktop image. All you need to do is open Ubuntu’s download page and download Ubuntu 22.04.1 LTS.
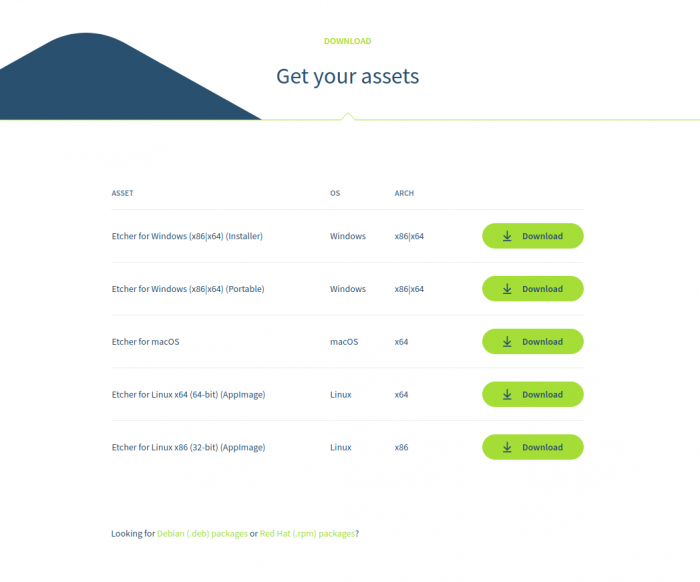
There are many image-flashing apps that you can use to install Ubuntu on your
USB drive. For this tutorial, we will be using balenaEtcher. balenaEtcher is a free and open-source program that is very user-friendly. Just open balenaEtcher’s download page and download Etcher for Windows.
With your Ubuntu image downloaded and balenaEtcher installed, it’s time to flash Ubuntu onto your USB. Plug in your USB drive and follow these instructions:
- Open balenaEtcher.
- Select your downloaded Ubuntu image.
- Select your USB drive for installing Ubuntu.
- Click Flash!
You now have a bootable Ubuntu USB drive that is ready to use for installation.
3. Booting Ubuntu from the USB drive
Option 1: Booting Ubuntu through Windows
To begin booting your Ubuntu USB drive through Windows, unplug and plug in the drive and follow these steps:
- Click on the Start button.
- Press and hold the Shift key while you click Power > Restart on your Start Menu.
Once your computer has rebooted, you should see a blue screen with options to choose from.
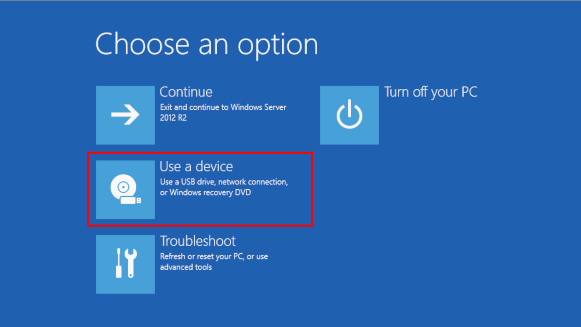
In the Choose an option screen, follow these instructions:
- Click Use a device.
- In the Use a device screen, choose Boot Menu.
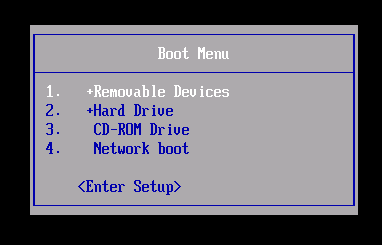
Windows will shut down. Your computer will restart and show a Boot Menu. The Boot Menu is a list of possible drive devices to start from. Select your Ubuntu USB stick and press Enter. This will start your computer through your Ubuntu USB drive.
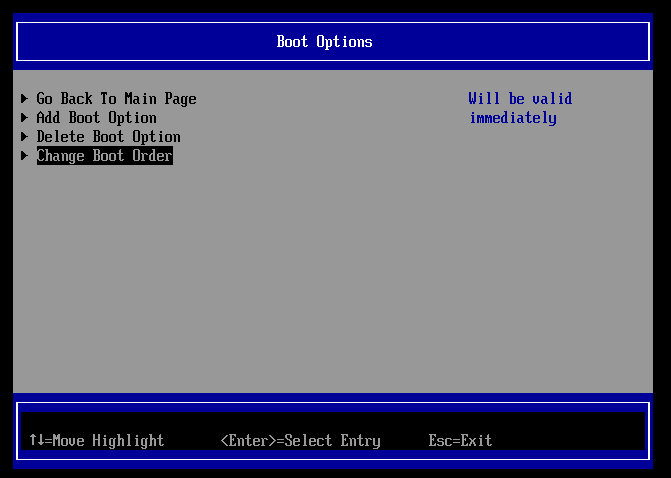
If your Boot Menu is a full BIOS Menu with multiple options, navigate to the Boot Options and change your computer’s boot order. Set your USB drive as the first position on the booting order. Save and exit the Boot Menu. This will start your computer through your Ubuntu USB drive.
Option 2: Starting with the Boot Menu key to boot Ubuntu
Your machine may reboot straight to your regular Windows system instead of showing the Choose an option screen. In that case, you will need to manually access the Boot Menu. Follow these steps from your Windows system:
- Click on the Start button.
- Press and hold the Shift key while you click Power > Shutdown on your Start Menu.
- Unplug and plug in your Ubuntu USB drive.
- Start up your computer.
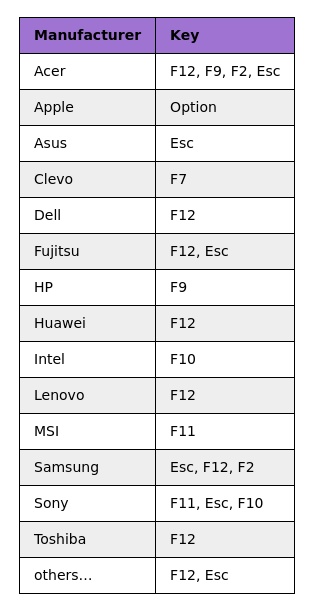
- Before your computer boots up Windows, immediately press your Boot Menu key several times.
F12 is the most common key for bringing up a computer’s Boot Menu. Escape, F2, and F10 are also common alternatives. Your computer’s Boot Menu key may also depend on the manufacturer. Identify your computer’s possible Boot Menu key in the following list:
Your computer should now show the Boot Menu. Follow the instructions on using the Boot Menu in Option 1, then start your computer through your Ubuntu USB drive.
4. Testing Ubuntu before installing
When your computer boots into your Ubuntu USB drive, you will enter the Ubuntu live environment and be greeted by a welcome screen. A live environment is a USB-based operating system that you can use without making changes to your computer until installed.
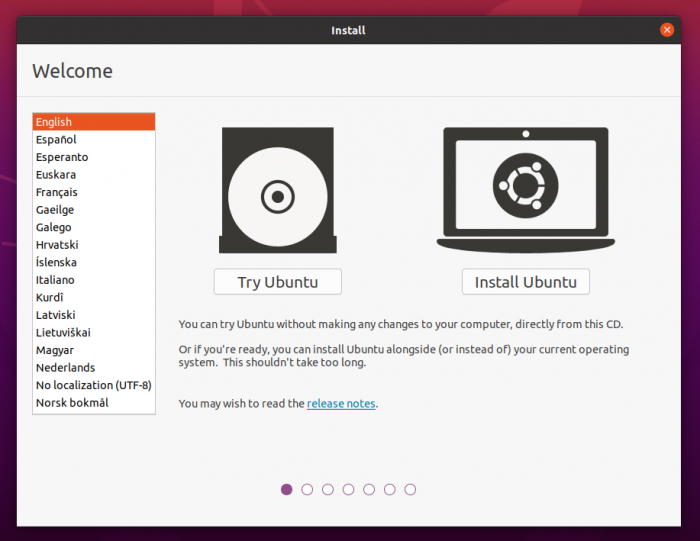
Before installing, click Try Ubuntu to preview Ubuntu through the live environment. You can proceed to install Ubuntu at any time by clicking the Install Ubuntu shortcut on the desktop. Get your very first look and feel of the operating system. Take Ubuntu’s default suite of applications for a test run.
This is also the time to test if your computer’s hardware functions are working properly. Check if your keyboard, mouse, sound, Wifi, Bluetooth, and graphics components are all functioning. Many new Ubuntu users will find their devices to be compatible with the operating system.
5. Installing Ubuntu on your hard drive
After testing Ubuntu on the live environment, you can begin the installation process. Click the Install Ubuntu 22.04 LTS shortcut on the desktop.
You will be asked to select a keyboard layout. You can manually select your computer’s keyboard layout. You can also click Detect Keyboard Layout to let Ubuntu find your keyboard layout for you. You can still add and change languages and keyboard layouts after installation. When you are ready, click Continue.

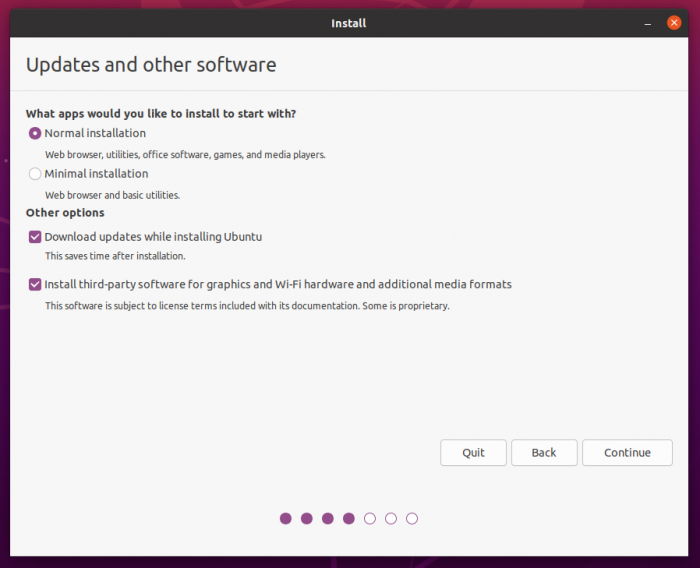
Next, you will be asked to choose your preferred type of installation. A Normal installation includes all the apps that a regular computer user will need. The Ubuntu live environment gives you the time to test out these apps for yourself.
A Minimal installation will only include a web browser and basic utilities. You may need to apply a minimal installation if you have less hard drive space. Either way, you are free to remove and install any Linux apps that you want after installing Ubuntu.
Other options are also present in this step. A stable internet connection is required if you choose to download updates while installing Ubuntu. Installing third-party software to improve device compatibility is also recommended.
On the next screen, you will choose the hard drive disk for your Ubuntu installation. For this tutorial, we will be erasing our old Windows install and completely switching to Ubuntu. Select Erase disk and install Ubuntu.
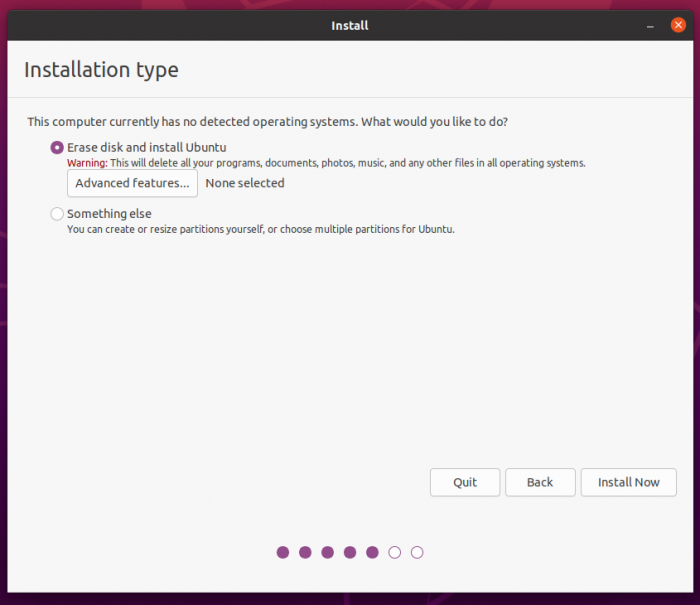
The Advanced features button gives you the option to encrypt your new Ubuntu install. Encrypting your Ubuntu system on your hard drive will make it more private and secure. This protects you from any malicious actors who might want to access and abuse your system.
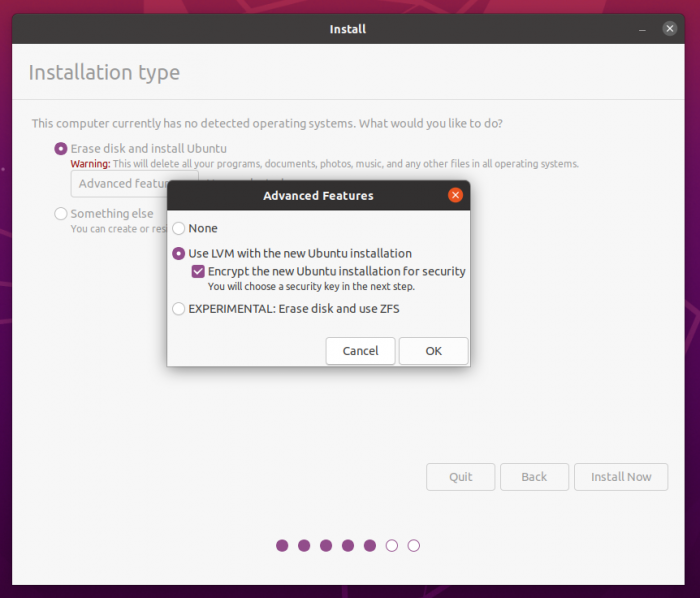
If you choose to encrypt your Ubuntu installation, you will be prompted to create a security key. You will have to enter this security key every time you open your computer so that you can decrypt and access your Ubuntu system.
Your security key should be strong, complicated, and memorable to you. It should contain lowercase uppercase letters, numbers, and symbols. Write your security key down and keep it in a safe place outside of your Ubuntu system. You will not be able to access and recover your data if you lose your security and recovery keys!
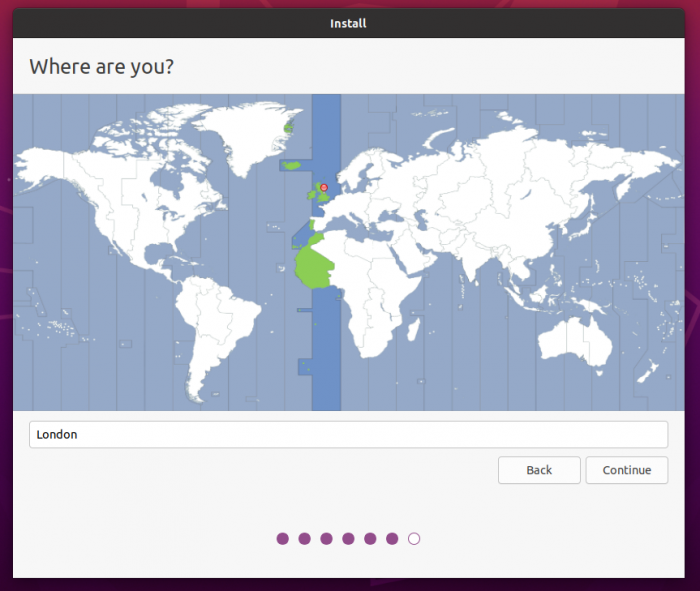
After choosing your installation drive, you will be prompted to select your location and timezone. It will be detected automatically if you are connected to the internet. Click Continue when you are done.
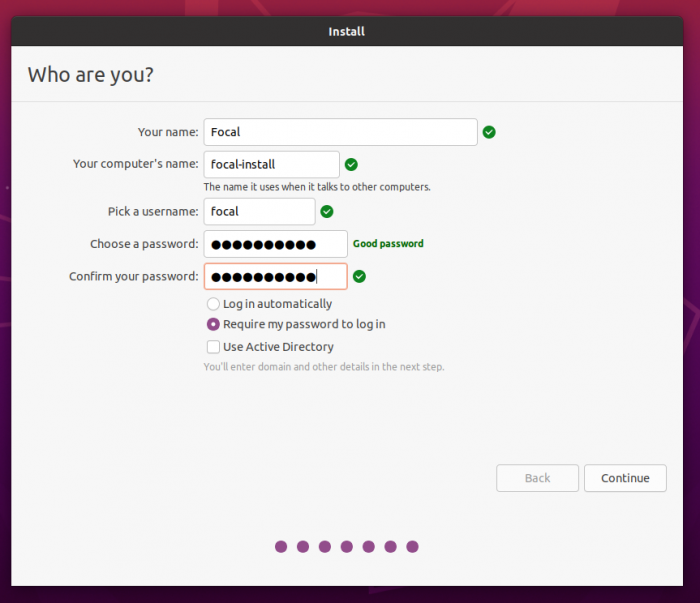
Finally, you will be asked to create your login details for Ubuntu. Enter your name, your computer’s name, and your username. Make sure to create a password that is strong, complicated, and memorable to you. If you chose to encrypt your Ubuntu install, your login password should differ from your security key.
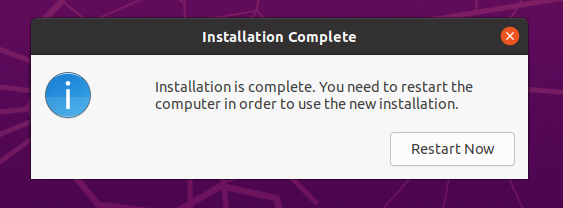
When you click Continue, the installation process will begin in the background. Get ready to sit back and relax, because the background installation will take some time.
Once the installation is complete, click Restart Now.
- Opening your Ubuntu install for the first time
Once you restart your device, unplug your USB install drive and press Enter.
Enter your password on the login screen and enjoy your new desktop operating system!