Samba is a software implemented on SMB/CIFS protocol for Unix and Linux based systems.It provides support for all common platform like windows ,linux(Ubuntu 9.10 or 10.04,open-suse,fedora,debian…),Mac so that you can share file and printers among your computers without any problem.Samba is an open source and free software.Samba is also used as NT4 style Domain control.On Ubuntu 10.04 you can install samba from command line or Synaptic Package Manager or Ubuntu Software Center.The Latest stable version of samba server is 3.5.4 and is available for download.

Installing Samba on Ubuntu
1. Open Ubuntu Software Center and search for “samba”.
2. Next,click on install(In the row which contains the packages you want to install,first and second results are ok for general purposes,but if you want some extra features like Mounting Remote File system,then install some extra packages-smbfs from Synaptic Package Manager).
3. Wait until the installation is complete.(It will take a couple of minutes only)
4. That’s All.
Configure Samba
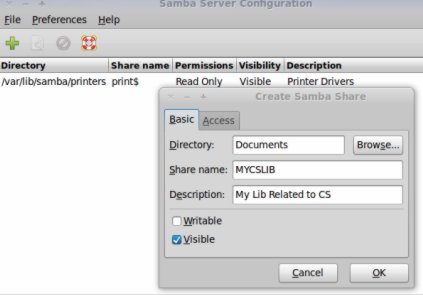
You can configure it from command line by using the command
gksu system-config-samba
Then configure the settings according to your need.You can also create a menu for samba in Applications->Accessories or a shortcut startup icon on taskbar by using Application Finder(search for “samba”,left click and drag it to task bar).Now,click on “+” then on Basic Tab and symbol to share some file and enter the details like Directory,share name,description and most important one access mode i.e visible or writable.Then click on access and Define who can access that file.(Every One or selected users only)