If you’ve installed Ubuntu 11.10 (or older version such as 11.04 or any other similar linux distributions such as Linux Mint 12) – then during installing process, you created a super user by default, but sometimes you need to create another user with root power i.e you want to create a sudo user, right? Yeah! because it’s not a good idea to use (or enable, because it’s disabled by default) root account for administrative tasks.
Creating another user or simply the user management in Ubuntu is not a complex task – as you can easily create/delete/update users from a clean, simple and easy to use graphical interface (Go to Top Right -> Click on Your Name -> Then click on your Icon). That’s it. No, there is another way to do that – from terminal – using some funky terminal commands.

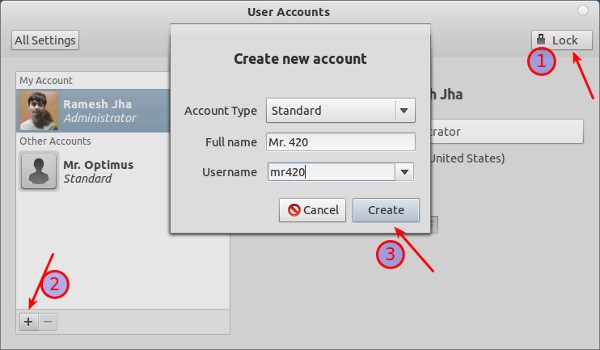
The above snapshot, explains the process of creating a new user account in Ubuntu 11.10 (running Gnome 3 with Gnome Shell Interface, wondering what theme? it’s Zukito; Isn’t it cool :)). Everything seems to be self explanatory. So lets move on to terminal approach which is more funky, powerful and preferred among linux users.
Create a User
To create a user in Ubuntu, open terminal (Ctrl+Alt+t) and execute the command (replace user_name with the username of your choice etc coolgeek).
sudo adduser user_name
(Then you will be prompted to Enter the details for the new user such as password, Name, Room Number, Phone Number etc, just enter the details correctly and hit ‘y’)
Granting sudo power to the User
Now, you’ve created the user, you can add the user to sudo group (which is created by default in Ubuntu, you could also use admin group) using the following command –
sudo adduser user_name sudo
OR
sudo adduser user_name admin

In the case if sudo group doesn’t exist or you want to create your own group then use the following commands –
Creating a Group (User Group)
First create a group using the command (Replace group_name with the group you want to create e.g geeky)-
sudo addgroup group_name
Then add that group to sudoers file, to do that first open the file using the command –
sudo visudo
and add the following line to the bottom of the file (then save the file and exit).
%group_name ALL=(ALL:ALL) ALL
Although creating groups isn’t necessary but it makes user management (with different privileges) much easier. Anyway, if you just want to grant root permission to any user then add this line to the sudoers file –
user_name ALL=(ALL:ALL) ALL
That’s All. Enjoy 🙂
I am the original user on this machine, and an “administrator”. I added a new user as “administrator” – so now there are two – yet my user can’t execute the command su from terminal, and also cannot use the software manager – it asks for *my* password! But the new user can sudo all day long, which of course means the new user can sudo apt-get install, too.
using visudo, we have
# User privilege specification
root ALL=(ALL:ALL) ALL
original_user ALL=(ALL:ALL) ALL
new_user ALL=(ALL:ALL) ALL
Still no joy.
How to add new user with *FULL* capabilities??