Ubuntu 12.04 (code named as : Precise Pangolin) is a LTS release (right now only beta version is available, stable will be out in a couple of weeks) – with 5 years of official support and updates. So LTS version is well suitable for production environment and if you’re using 11.10 or any other versions then you may want to switch to 12.04 for latest features, packages and stability.
This guide is made for absolute beginners, and will help in setting up Ubuntu 12.04 along with their existing operating system; although it’s not necessary because now you can do everything on Ubuntu and it’s fairly simple to use (and the absolute Freedom offered by Free ‘n’ Open Source softwares) , so you may swap out your current operating system completely with Ubuntu 12.04.
To install Ubuntu – first create a live USB, CD or DVD installer and boot your system – you may need to change your BIOS settings if your computer doesn’t boot from the live media installer. To get into the BIOS menu simply hit F2 or F12 or Del key – it depends on your system. Then, navigate through the arrow key and go boot devices/options and enable the USB boot, then change the order of bootable media (put USB on top) and save it (you may have to hit F10 for that).
The installation process is quite easy but first of all you must create a backup of all your important data – it’s not like you’re going to lose the data but you can’t blame me if anything goes wrong. So it’s better to have everything backed up before you start.
Although, step by step manual is described below, this screencast may help you a lot.
Step by Step Instruction for installing Ubuntu 12.04
step 0. Make Sure, You’ve backed up your important data
First of All, Backup All Your Important Data (either online, using Amazon s3 or offline or whatever way you prefer – but you must have backed up your critical data before moving to the next step)
step 1. Create USB installer
Download Ubuntu 12.04 ISO (according to your computer architecture such as 32 bit or 64 bit, and of course the Desktop Edition)
If you’re using Windows 7(most probably you’re, otherwise you wouldn’t be reading this, just kidding 🙂 move on) or XP/Vista – then create a USB installer using the application – Universal USB Installer. It’s quite easy – download and run this installer – and locate the ISO file, select the target USB drive.
If you’re using any older version of Ubuntu such as 11.10 or 10.04 then there is one application you need to use – Startup Disk Creator, installed by default on Ubuntu. Run the application, locate the ISO image and make your pen-drive bootable.
Anyway, at the end of this step – you must have a USB stick installer for Ubuntu 12.04.
step 2. Initiating Installation procedure
Now, you got the live usb installer for Ubuntu 12.04 LTS, restart you computer and boot it from the installer. If there is any booting problem check your BIOS settings – it should be able to boot from a USB and the priority should be #1 (although it’s not really required if you manually select the bootable media).
First look at Ubuntu 12.04 (with the default Unity interface)-

Click on Install Ubuntu 12.04 LTS button to start the installation process – although you can get an overview without even installing it on your hard-drive.

Now select Language – The default is English, but Ubuntu supports a lot of other languages – so you can run ubuntu in your native language.

Now’re you’re ready to install Ubuntu 12.04 on your hard disk. Although Internet connection is recommended but it’s not strictly required during installation as you can always updates or install new packages later. In some cases – Wifi network it may not be detected automatically – just relax you can configure that later.

step 3. Create hard drive partition for Ubuntu
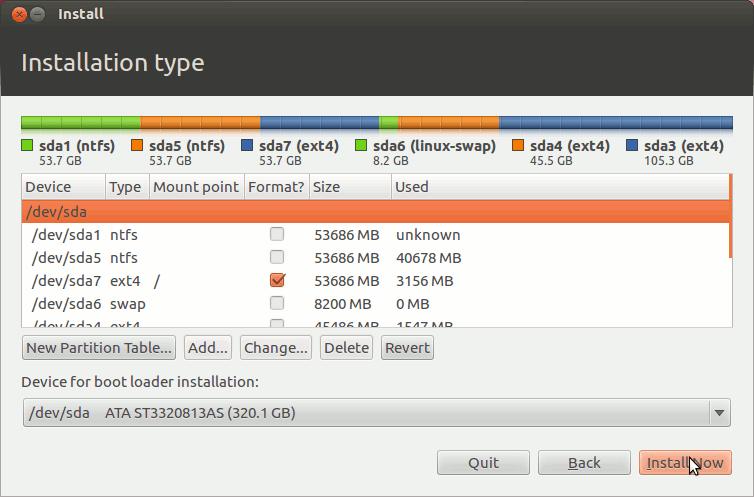
Select Installation type – ‘something else’, the third option as it’s the safest method and you get more control over what’s going on.

Now you need to create a ext4 partition for Ubuntu 12.04; use the partition manager – swap out Windows (if you don’t want to keep windows) or unused partition or create new partition from existing hard drives.

Now click on Free Space -> Add -> Create Partition.

select the target partition (check the box), where Ubuntu 12.04 will be installed.

Until now, no hard disk changes has been committed – Now you can click on install Now button to begin installation.

step 4. Installing Ubuntu 12.04
Select your physical location from Map.

Next, choose the keyboard layout, if you’re not sure what option you should choose – then you should probably go for default value.

Enter the user (You, the sudo user) account detail – that will be created during installation procedure (you can create/manager user later).

Wait until the installation process is complete. If you’re connected to internet – it may take little extra time because of update/extra language packs – if you don’t want them, then skip those steps. (if don’t get it clearly, then watch the video)

step 5. Finishing Installation – Restart!

Have Fun 🙂
Update1 : BIOS settings related details added. Thanks to @Eric Criens.
it’s cool
OK this is for absolute beginners and then you say something like “change your BIOS settings” – very clear…. NOT !
Also with the “other” installation… what if I don’t want to upgrade but do a clean install but don’t want to loose all my settings and installed software with the other Ubuntu version that I am trying to replace…?
Oh!, actually BIOS settings are accessed in different ways on different systems – on my desktop it’s accessible via F2 but I don’t know about others. Some other keys are Del, F12. That’s why I skipped that part.
Anyway, thanks for clearing that – I’ll update the post.
Regarding you other installation – just backup your settings/packages (on a separate partition or external hard drive) using some backup programs such as DejaDup and restore it later after the fresh installation.
Hey, thanks for the effort this guide is fantastic for a average windows user wanting to know more about Linux….I have downloaded everything and have booted from the USB. The crappy computer Im using to learn Linux on is a Dell Optiplex 755 4gb ram C2D 3.0ghz and Im running windows 7 ultimate without any problems. However, when I boot from the USB in bios I get as far as the screen that has Ubuntu and some dots underneath which change from white to red and back etc….when I press the ‘esc’ key I get a wall of text which I have no damn idea what it is indicating all I know is Ubuntu won’t load at all….any idea what I should do….thanks again!
is using ubuntu 12.04 through wubi harm my laptop
Here in this step 3. in the image the different partitios are available. But in my laptop It is not showing like dis. In my lap itz showing the whole hard disk size 500GB. I have windows7 installed. And I left a 90GB drive for ubuntu. when it comes in step 3 the created partition “UBUNTU” is not der. only they r showin full size of hdd. what can I do? I need your help as soon as possible. my mail id :arjundevp09@gmail.com
plz do reply…..
what option did you choose in the beginning of the step #3 ? (you must select the custom option)
i’ve selected d 3rd option Custom(they written “something else”….
That same window s appearing. but d different partitions are not showing.
give me ur mail id I will send u the inage file of step #3 in my lap…. it may be easier for u 2 dolve my problem.
ramesh@rameshjha.com (you could also find it in contact page)
yea. i got it. I will mail u nw. Plz do reply.
I’ve sent the mail…
I hav important datas in all drives except the one lefy for ubuntu. plz do reply…
hello,
i have downloaded ubuntu 12.04.1 LTS and was trying to install it on my ASUS Laptop. i made a bootable pendrive of it and booted it on the laptop. but when the page to select partions (to install ubuntu) comes, i am unable to see my partions (created in windows). i had 3 partions – C, D, E of 116gb, 116gb and 232gb resp. but it shows something else only in ubuntu.
what to do…?
plz do reply…..
in Ubuntu, and Linux in general, partitions are labeled differently, /sdb1 for example, you should identify them during installation by its size or filesystem, so you can see which label belongs to what partition.
Old but very nice article…It wub be cool if u add d SWAP space detail too